
centos 7 安装oracel 12c
文章目录
前言
本文介绍如何使用快速安装功能在CentOS 7.1(64位)上部署Oracle Database 12c(12.1.0.2.0)。 原文地址 centos 7 安装oracel 12c、本文对原贴翻译并加入安装过程踩到的坑。
系统参考配置:
[root@localhost ~]# hostnamectl
   Static hostname: localhost
Transient hostname: localhost.localdomain
         Icon name: computer-desktop
           Chassis: desktop
        Machine ID: 3becbec7e6164b31a87540573b4fc957
           Boot ID: 4fcc8bc181c742a6a96416a0dfd6ac3f
  Operating System: CentOS Linux 7 (Core)
       CPE OS Name: cpe:/o:centos:centos:7
            Kernel: Linux 3.10.0-862.2.3.el7.x86_64
      Architecture: x86-64
安装前提
成功安装操作系统后,请验证主机名并将其注册到您的DNS中。或者将您的主机名/ IP添加到/etc/hosts。
[root@localhost ~]# cat /etc/hostname
localhost
保持SELinux处于强制模式并启用防火墙:
[root@localhost ~]# sestatus
SELinux status:                 enabled
SELinuxfs mount:                /sys/fs/selinux
SELinux root directory:         /etc/selinux
Loaded policy name:             targeted
Current mode:                   enforcing
Mode from config file:          enforcing
Policy MLS status:              enabled
Policy deny_unknown status:     allowed
Max kernel policy version:      28
[root@localhost ~]# firewall-cmd --state
running用最新的软件包更新CentOS系统:
[root@localhost ~]# yum update -y
提示
这里替换为国内163的镜像地址、否则下载速度太慢: 下载对应版本repo文件, 放入
/etc/yum.repos.d/localhost-Base-163.repo 备份/etc/yum.repos.d/CentOS-Base.repo[root@localhost ~]# mv /etc/yum.repos.d/CentOS-Base.repo /etc/yum.repos.d/CentOS-Base.repo.backup运行以下命令生成缓存:root@localhost ~]# yum clean allroot@localhost ~]# yum makecache
下载适用于Linux x86-64软件的Oracle Database 12c: http://www.oracle.com/technetwork/database/enterprise-edition/downloads/index.html
安装步骤
为Oracle数据库创建所需的OS用户和组:
[root@localhost ~]# groupadd oinstall
[root@localhost ~]# groupadd dba
[root@localhost ~]# useradd -g oinstall -G dba oracle
[root@localhost ~]# passwd oracle将以下内核参数添加到/etc/sysctl.conf
fs.aio-max-nr = 1048576
fs.file-max = 6815744
kernel.shmall = 2097152
kernel.shmmax = 1987162112
kernel.shmmni = 4096
kernel.sem = 250 32000 100 128
net.ipv4.ip_local_port_range = 9000 65500
net.core.rmem_default = 262144
net.core.rmem_max = 4194304
net.core.wmem_default = 262144
net.core.wmem_max = 1048586
检查并应用新值。
[root@localhost ~]# sysctl -p
[root@localhost ~]# sysctl -a在/etc/security/limits.conf中指定oracle用户的限制
oracle soft nproc 2047
oracle hard nproc 16384
oracle soft nofile 1024
oracle hard nofile 65536将压缩的Oracle数据库软件压缩文档(linuxamd64_12102_database_1of2.zip,linuxamd64_12102_database_2of2.zip)解压缩到/stage文件夹:
[root@localhost ~]# yum install -y zip unzip
[root@localhost ~]# unzip linuxamd64_12102_database_1of2.zip -d /stage/
[root@localhost ~]# unzip linuxamd64_12102_database_2of2.zip -d /stage/修改/stage上的权限
[root@localhost ~]# chown -R oracle:oinstall /stage/
为Oracle软件创建/u01目录,为数据库文件创建/u02目录:
[root@localhost ~]# mkdir /u01
[root@localhost ~]# mkdir /u02
[root@localhost ~]# chown -R oracle:oinstall /u01
[root@localhost ~]# chown -R oracle:oinstall /u02
[root@localhost ~]# chmod -R 775 /u01
[root@localhost ~]# chmod -R 775 /u02
[root@localhost ~]# chmod g+s /u01
[root@localhost ~]# chmod g+s /u02
安装所需软件包:
[root@localhost ~]# yum install -y binutils.x86_64 compat-libcap1.x86_64 gcc.x86_64 gcc-c++.x86_64 glibc.i686 glibc.x86_64 \
glibc-devel.i686 glibc-devel.x86_64 ksh compat-libstdc++-33 libaio.i686 libaio.x86_64 libaio-devel.i686 libaio-devel.x86_64 \
libgcc.i686 libgcc.x86_64 libstdc++.i686 libstdc++.x86_64 libstdc++-devel.i686 libstdc++-devel.x86_64 libXi.i686 libXi.x86_64 \
libXtst.i686 libXtst.x86_64 make.x86_64 sysstat.x86_64
安装“X Window System”软件包:
[root@localhost ~]# yum groupinstall -y "X Window System"
由于Oracle安装需要GUI,所以有两种简单的方法来提供它:
方案一、
通过SSH从图形Linux机器远程登录。ssh -X oracle@OracleserverIP
方案二、
使用带有SSH客户端(PuTTY)和X-Windows终端仿真器(Xming)的Microsoft Windows桌面。 以下文章介绍了如何在Windows系统上安装Xming。
Xming X-Windows terminal emulator for Microsoft Windows computers
提示
由于我的电脑是安装的 xshell,所有列出下面的使用 xmanager 的附件方案
xshell 方案、
安装 xmanager:
downloads xmanager installer.exe
一直点击下一步默认安装即可。
然后在 xshell 连接属性界面设置 由xmanager转发X Window界面。
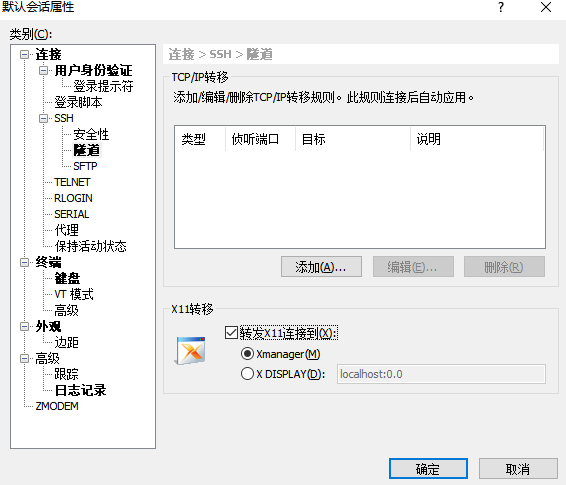 使用上述解决方案以“oracle”用户身份登录并运行Oracle安装程序即可弹出 Oracle 安装程序的图形界面:
[oracle@localhost ~]$ /stage/database/runInstaller
Starting Oracle Universal Installer...
Oracle安装程序界面
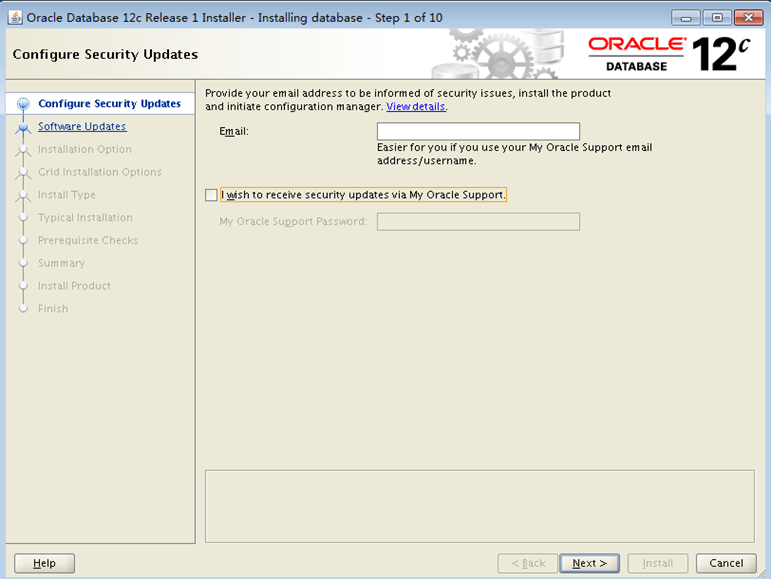
第1步 - 安全更新
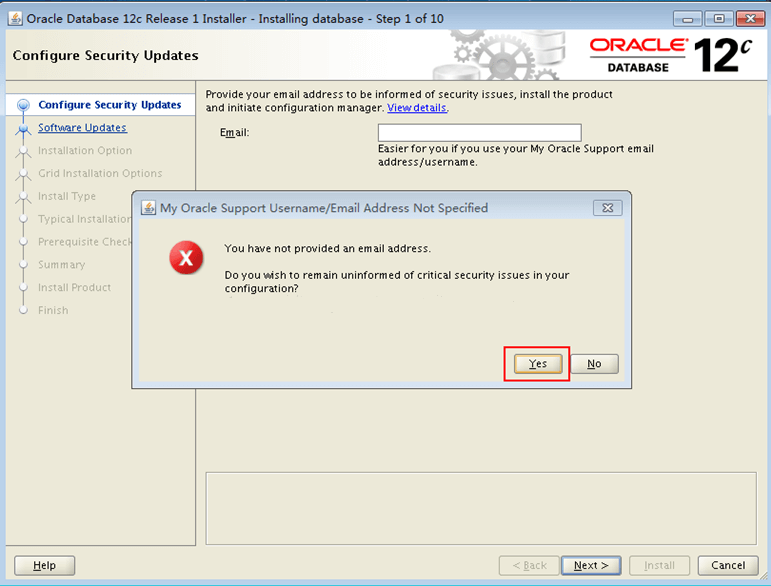
如果您不希望从Oracle支持中收到电子邮件,请取消选中该复选框,然后单击下一步。 另一个窗口打开,点击 YES。
第2步 - 安装选项
选择 “Create and configure a database” 然后单击下一步。
第3步 - 系统类
选择“Desktop Class”进行Oracle数据库的简单默认安装。
第4步 - 典型安装
在安装配置屏幕上,指定主要功能。
| Oracle base | /u01/app/oracle |
|---|---|
| Software location | /u01/app/oracle/product/12.1.0/dbhome_1 |
| Database file location | /u02 |
| Global database name | orcl.example.com |
还要指定合适的“数据库版本”以及“字符集”。为数据库管理设置“强密码”,并最终取消选择“创建为容器数据库”选项。
第5步 - 创建库存
按照默认的/ u01/app/oraInventory并单击下一步。
第6步 - 安装前提检查
安装程序自动验证所有必需的操作系统软件包和操作系统内核设置。
第7步 - 总结
最终机会编辑任何安装功能。点击安装。
第8步 - 执行配置脚本
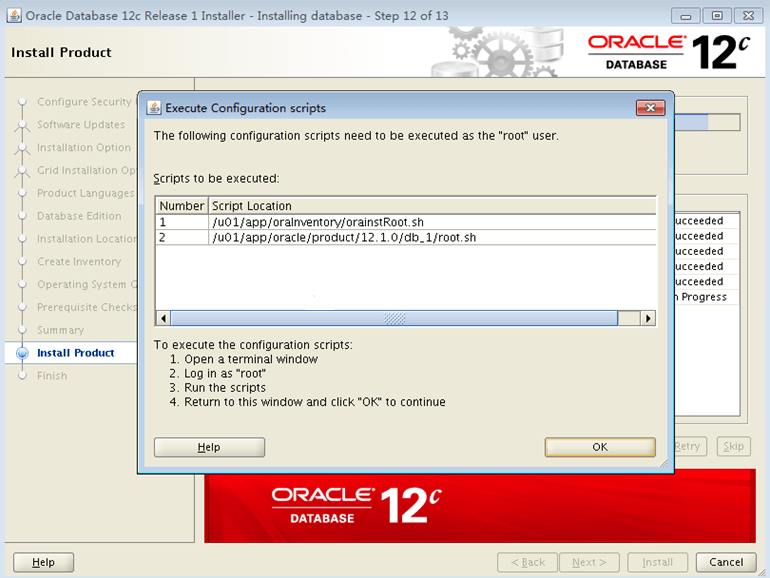 当出现请求窗口时,以
root身份登录并执行两个脚本:
[root@localhost ~]# /u01/app/oraInventory/orainstRoot.sh
Changing permissions of /u01/app/oraInventory.
Adding read,write permissions for group.
Removing read,write,execute permissions for world.
Changing groupname of /u01/app/oraInventory to oinstall.
The execution of the script is complete.
[root@localhost ~]# /u01/app/oracle/product/12.1.0/dbhome_1/root.sh
Performing root user operation.
The following environment variables are set as:
ORACLE_OWNER= oracle
ORACLE_HOME= /u01/app/oracle/product/12.1.0/dbhome_1
Enter the full pathname of the local bin directory: [/usr/local/bin]: <PRESS ENTER>
Copying dbhome to /usr/local/bin ...
Copying oraenv to /usr/local/bin ...
Copying coraenv to /usr/local/bin ...
Creating /etc/oratab file...
Entries will be added to the /etc/oratab file as needed by
Database Configuration Assistant when a database is created
Finished running generic part of root script.
Now product-specific root actions will be performed.
You can follow the installation in a separated window.这两个脚本必须以root身份运行。
第9步 - 安装进度
此时会打开另一个窗口来显示安装进度。不要关闭这个窗口。
第10步 - 安装成功
最后一个屏幕通知安装已完成并显示Oracle企业管理器URL。 https://localhost:5500/em 点击 “OK” 关闭安装窗口。
安装后任务
防火墙设置
以root身份登录并验证活动区域:
[root@localhost ~]# firewall-cmd --get-active-zones
public
  interfaces: enp2s0
开放需要的端口:
[root@localhost ~]# firewall-cmd --zone=public --add-port=1521/tcp --add-port=5500/tcp --add-port=5520/tcp --add-port=3938/tcp --permanent
success
重启防火墙、查看端口列表:
[root@localhost ~]# firewall-cmd --reload
success
[root@localhost ~]# firewall-cmd --list-ports
1521/tcp 3938/tcp 5500/tcp 5520/tcp
设置 Oracle 环境变量
以oracle用户登陆并把下面的变量添加到/home/oracle/.bash_profile:
TMPDIR=$TMP; export TMPDIR
ORACLE_BASE=/u01/app/oracle; export ORACLE_BASE
ORACLE_HOME=$ORACLE_BASE/product/12.1.0/dbhome_1; export ORACLE_HOME
ORACLE_SID=orcl; export ORACLE_SID
PATH=$ORACLE_HOME/bin:$PATH; export PATH
LD_LIBRARY_PATH=$ORACLE_HOME/lib:/lib:/usr/lib:/usr/lib64; export LD_LIBRARY_PATH
CLASSPATH=$ORACLE_HOME/jlib:$ORACLE_HOME/rdbms/jlib; export CLASSPATH重载bash_profile文件使新的设置生效:
[oracle@localhost ~]$ . .bash_profile
登陆数据库
[oracle@localhost ~]$ sqlplus system@orcl
... output omitted ...
Oracle Database 12c Enterprise Edition Release 12.1.0.2.0 - 64bit Production
With the Partitioning, OLAP, Advanced Analytics and Real Application Testing options
[enter password]:
SQL>
用远程管理器管理数据库: 访问https://localhost:5500/em即可